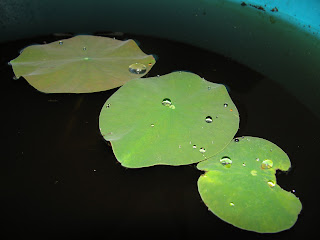
Lotus Germination
31 Jul 2022
I've heard negative and positives about growing Lotus from Seeds but i decided to try anyway. I purchased the seed pods from a dried flower arrangement at the craft store. I got about 42 mature seeds out of the pods (and several unripe). Fingers are crossed that it wasnt heat dried and the seeds are still viable. They were on sale so if they are no good i only wasted three dollars. Lets hope i get lucky! Enjoy my how-to:)
DAY 1: March 30, 2011
I got all the seeds out of the pods by prying them with a knife. Easy enough.
I scarified them with a metal file till i saw the cream center. I just held them in place with a pair of pliers and sawed with the file. Its not hard but annoying. The seeds can be very thick and tough!
After i scarred them i put them in a plastic bowl in warm water. I know i scarred them good enough because you can see air bubbles escaping from the seeds. I set them in the window sill. The plan is to change the water and replace it with fresh warm water once or twice a day.Here's a picture of the scarified seeds in the water. And now we wait!

MARCH 31 After only one day of soaking the seeds are really beginning to swell!
April 2, 2011...(Day 4 of soaking)...I spotted one of the seeds splitting! I hope this means green is to follow soon!
STEP 1: I poured 1 cup of osmocote fertilizer into the bottom of the tub.
STEP 2: I then filled the tub with about 9-10" of 1/2 composted manure and 1/2 garden soil, *mixed together well*. maybe slightly more compost than garden soil (I didn't measure) However, I did make sure the top layer was manure to limit floating stuff.
STEP 3: I poured a very thin layer of aquarium gravel to also help prevent floating stuff.
STEP 4: I filled the tub with water until it stopped bubbling(the soil was completely saturated) and left about 3-4" of water above the surface of the gravel. scooped up what did float with a fish net.
STEP 5: my final step was to make an impression in the gravel and place my sprout down into it and LIGHTLY covered with gravel just enough to keep the seed from floating up. make sure not to cover too deep or cover growing tips.
DAY 1: March 30, 2011
I got all the seeds out of the pods by prying them with a knife. Easy enough.
I scarified them with a metal file till i saw the cream center. I just held them in place with a pair of pliers and sawed with the file. Its not hard but annoying. The seeds can be very thick and tough!
After i scarred them i put them in a plastic bowl in warm water. I know i scarred them good enough because you can see air bubbles escaping from the seeds. I set them in the window sill. The plan is to change the water and replace it with fresh warm water once or twice a day.Here's a picture of the scarified seeds in the water. And now we wait!
MARCH 31 After only one day of soaking the seeds are really beginning to swell!
April 2, 2011...(Day 4 of soaking)...I spotted one of the seeds splitting! I hope this means green is to follow soon!
April 3, 2011..... I see green!! it happened last night and all through today the "hooks" have been coming out. I did help them out a little by *gently* pulling off the hard dark coating around where the sprout was making its way out. I read this method on a lotus info site and it really seemed to help because seeds that hadnt sprouted are now out! one lotus seed in particular seems to be doing the best. its been the fastest and biggest sprout throughout the whole process. Every time i changed the water I swear i could see the sprout pushing its way further out right before my eyes.
HERES PICTURES AFTER I REMOVED SOME OF THE SEED COATING
NOW HERES PICTURES LESS THAN 24 HRS LATER(April 3)
APRIL 4th, 2011...... (about 5 days after soaking) I decided 4 out of 8 of the seeds were ready to be planted. I used miracle grow garden soil. Since I live in Fl. clay isn't readily available. For now i put the seedlings in milk jugs with the top cut off by i have Rubbermaid bins ready for them once they get established. I stuck them in the soil with my fingers till just the green was out. and left a couple inches of water over them. They are now sitting in the sun, on the patio.I can't wait for them to really take off.
*As for the remaining four seeds I know there's life inside because i can see green but they just haven't found the strength to sprout yet. I'm hoping patience will pay off.
PICTURES OF READY SEEDS
PLANTED IN THEIR TEMP HOMES
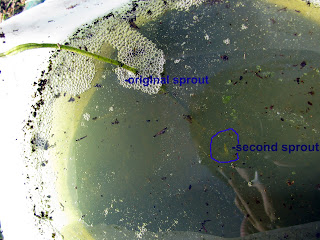
APRIL 5, 2011 (about a week after starting) a second stem is appearing!
after planting them they have been getting taller every day reaching for the surface! and now we wait for the unfurling of their very first leaf!!
APRIL 8TH....Only updates are that the sprouts have grown about an inch past the surface and the curled leaves are beginning to separate from the stems. also some of the plants have sprouted a second leaf from the seed.
HERE YOU CAN SEE THE LEAF SEPARATING FROM THE STEM
AND HERE'S THE SECOND SHOOT EMERGING
Only problem I have encountered so far(and very minor at that) is that my water is getting a green bubbly film :( I have just been scraping it off by hand. I'm assuming its algae from stagnant water being in full sun all day.
APRIL 10, 2011 (around noon)
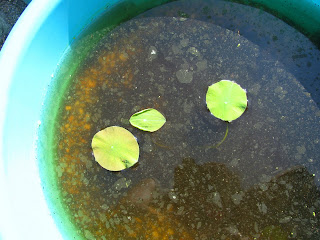
- I went to check on my lotus and they seem to be in a very slow and stubborn stage but the sprout that has been the strongest this whole process is unrolling its very first leaf today (finally) and the same sprout now has a second stem breaking the waters surface to start making leaf #2 !
- All the other sprouts leaves are still rolled tightly but separated from the stem.
- As for the remaining 4 lotus seeds. they are still being lazy, and not sprouting but I'm not giving up since I can see green in every one of them!
well i take back what i said about peeling the seed because the ones that hadn't come out yet when i did it are now rotting:( dont help your seeds! *on to better news...
April 11, 2011
**my first official floating leaf!!**
SO THRILLED!
APRIL 13, 2011 *two weeks after soaking* I decided to start planting the lotus in more permanent homes..no more milk jugs:)
This is how I did it.
SUPPLIES:
- Of course my sprout from a dried lotus arrangement from Hobby Lobby craft store*on sale ($3.99) * I did the math and I paid about 10 cents for each seed
- 18 gallon toy tub from walmart 18" x 16"(about $6.00)
- miracle grow garden soil *1.5cu.ft. ($5.00)
- compost cow manure from home depot*40lb. bag ($1.50ea.)
- osmocote granule fertilizer (veggie and flower formula) ($14.00)
- gravel (I used the kind from the fish section. I had it from other projects) ($11.00)
STEP 1: I poured 1 cup of osmocote fertilizer into the bottom of the tub.
STEP 2: I then filled the tub with about 9-10" of 1/2 composted manure and 1/2 garden soil, *mixed together well*. maybe slightly more compost than garden soil (I didn't measure) However, I did make sure the top layer was manure to limit floating stuff.
STEP 3: I poured a very thin layer of aquarium gravel to also help prevent floating stuff.
STEP 4: I filled the tub with water until it stopped bubbling(the soil was completely saturated) and left about 3-4" of water above the surface of the gravel. scooped up what did float with a fish net.
STEP 5: my final step was to make an impression in the gravel and place my sprout down into it and LIGHTLY covered with gravel just enough to keep the seed from floating up. make sure not to cover too deep or cover growing tips.
**water is still Clearing but here is there current status.**
3days later
well as you can see the rocks didn't help keep the soil from coming up so I guess you can just skip this step if you want. I did with the remaining three.
April 24, 2011
JUST SOME PICS WHILE WAITING ON AERIALSHere's one of my lotus from a second batch! its got floaters and aerials that measure a foot across!


